Stan Sakai wrote: January 27, 2016
I sent in the artwork for UY 154. As usual, the total image area is 10x15 inches on 11x17" 2-ply 500 series, cold press Strathmore bristol board.
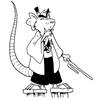
Here is a step-by-step of one of a 1/3 tier panel.
1. Penciled with a 3mm 2H lead, then a 5mm HB. Panel outlined with 3.5 technical pen. Word balloon with a Koh-i-noor art pen.
The lettering was written with a Rotring Sketch Pen, which has a rigid nib. I use a Fine point for regular lettering, but in this case used a Bold point for emphasis.
2. Foreground figures inked with an older Koh-i-noor Art Pen and Badger Black Opaque ink (old formula). I'm still on the look out for a new brand of ink.
I built it up because I wanted to make that first foreground character pop out.Chuck Dillon wrote: Do you build up the thicker weight lines or do it in one stroke?
3. Background inked with a newer, and stiffer, Koh-i-noor pen.
4. The panel is erased, then blacks spotted with a brush. Textures and clothing designs added, and the panel is finished.
Usagi Yojimbo #154 step-by-step process
-
Steve Hubbell
- Taisho
- Posts: 6052
- Joined: Thu Sep 19, 2002 15:25 -0700
- Location: Kalamazoo, MI
Usagi Yojimbo #154 step-by-step process


-
Lobster Johnson
- Shugyosha<Student Warrior>
- Posts: 623
- Joined: Mon May 25, 2015 17:17 -0700
Re: Usagi Yojimbo #154 step-by-step process
Cool. Looks like the return of the Komori ninja! 